My first backup video used Microsoft OneDrive as the example. After that, many comments came in with the same question: And how does that work with Google Drive? Fair enough – not everyone wants to use Microsoft. So here’s the answer.
The good news upfront: Home Assistant encrypts its backups by default before they reach the cloud. That means neither Google nor Microsoft can read the contents. This makes storing backups on a third-party service perfectly acceptable from a privacy standpoint – and takes the wind out of one of the most common objections.
The setup with Google Drive is more complex than with OneDrive, however, because you need to complete a few steps in the Google Cloud Console. I’ll walk you through all of them.
Home Assistant Backups with Google Drive
In my previous video on backups, I introduced the new backup mechanism in Home Assistant starting with version 2025.1 and demonstrated – using Microsoft OneDrive as an example – how easy it is to store encrypted backups at a secure second location using the built-in options. The Microsoft OneDrive integration in Home Assistant is very straightforward, but not everyone wants to use OneDrive.
So in this video, I want to show another popular alternative: integrating Google Drive into Home Assistant, step by step. The initial setup is more complex than with OneDrive, so I’ll walk through the entire process.
By the way: since Home Assistant encrypts its backups by default, storing such sensitive backups on cloud storage from Microsoft or Google is not a privacy concern at all, and can in my assessment be done without hesitation.
If you’d like to familiarize yourself with the basics of the new backup mechanism first, I recommend watching this video before continuing. In the following, I’ll focus exclusively on integrating Google Drive into the backup mechanism and won’t repeat the general overview of Home Assistant’s backup system here.
Prerequisites
You’ll need a Google account to get started. Your Home Assistant installation also needs to be running a version that supports the new backup mechanism, i.e., version 2025 or later.
What you need to set up in Google and why:
For Home Assistant to communicate with Google Drive, you need to create the following elements in the Google Cloud Console:
-
Google Cloud Project
The project is the container where all configuration for your Home Assistant connection is collected. You can manage specific settings and all access centrally here. -
OAuth Consent Screen
This step is required to identify Home Assistant as an application authorized to communicate with your Google Drive. Here you define basic information about the application, such as name, email address, and access permissions. -
OAuth Client (Web Application)
The OAuth client is the access key that Home Assistant uses to authenticate with your Google account. It consists of two parts: the Client ID and the Client Secret. These are entered into Home Assistant later. -
Google Drive API
This API allows Home Assistant to access your Google Drive and store or retrieve files there. It must be explicitly enabled for the connection to work. -
Test Users
Since your application is not verified by Google, you need to add your own email address as a test user to gain access.
Integrating Google Drive into Home Assistant
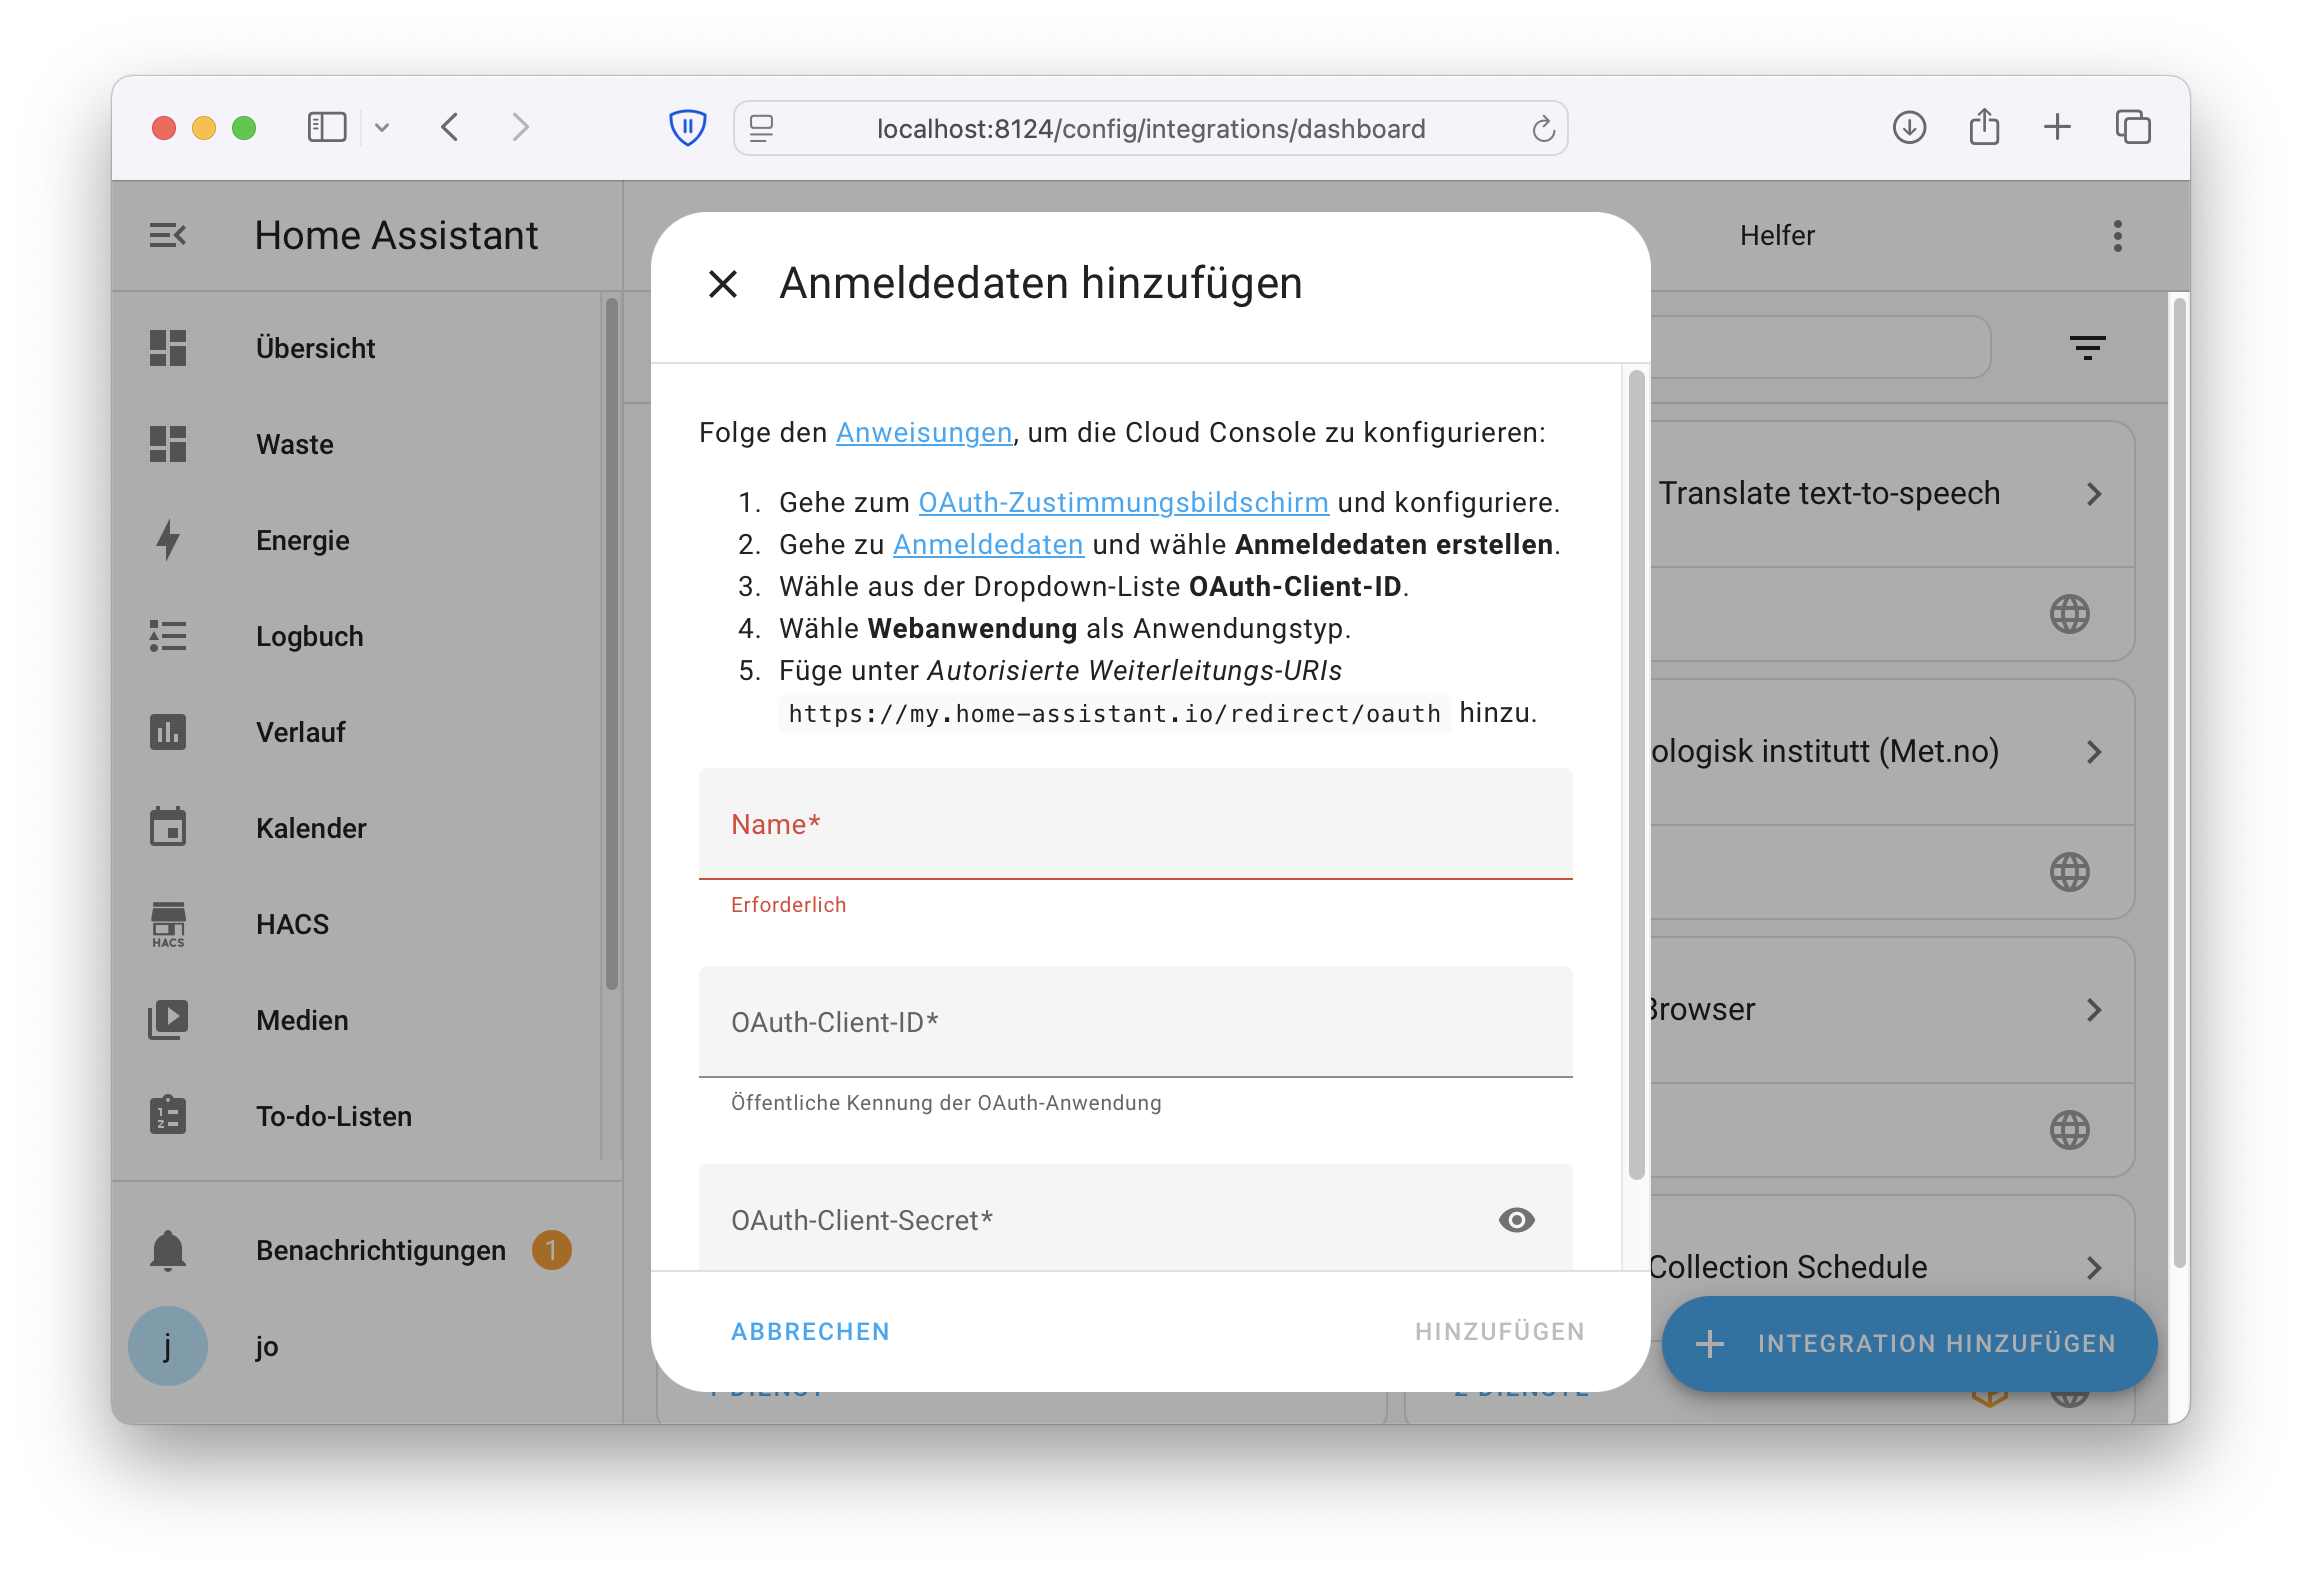
In your Home Assistant installation, go to Settings and then Integrations. Click Add Integration and search for the entry Google → Google Drive.
The setup wizard that follows will ask you for a name (which you can choose freely), as well as an OAuth Client ID and an OAuth Client Secret.
In the upper section of the setup wizard, the necessary links are provided for creating this ID and secret. Let’s take a closer look at those now.
Google Cloud Platform Login
Click the OAuth Consent Screen link and sign in with your Google account if you haven’t already. You’re now in the configuration area of the Google Cloud, in the Google Authentication Platform dialog.
Creating a Google Project
If you’ve never been here before, you need to create a project first.
- Click Create Project and give your project a name, for example
Home Assistant Backup. - Click Create and wait a few seconds for the project to be created.
Registering an OAuth Application with Google
Creating the OAuth Configuration
You’ll now see the OAuth Overview screen with a notice that the Authentication Platform has not yet been configured.
- Click Get started.
- Enter a name for the app, for example
Home AssistantorHome Assistant Backup. - Under User support email, select your email address from the dropdown menu and click Next.
- Under Audience, select the option External and click Next.
- Under Contact Information, enter your Google email address and click Next again.
- Confirm the User Data Policy with a click and select Continue.
- Click Create.
Google will now confirm with the message OAuth Configuration Created that everything was set up successfully.
Creating an OAuth Client
- On the screen shown, click Create OAuth Client.
- Under Application Type, select Web Application.
- Leave the name as
Web Client 1or enter a custom name likeHome Assistant Backup. - Scroll down and under Authorized Redirect URIs, click the Add URI button.
- Paste the address that Home Assistant shows you in the setup dialog under Step 5.
- Click Create.

Google will now display the generated Client ID and Client Secret. Copy this information and paste it into the Home Assistant setup dialog.
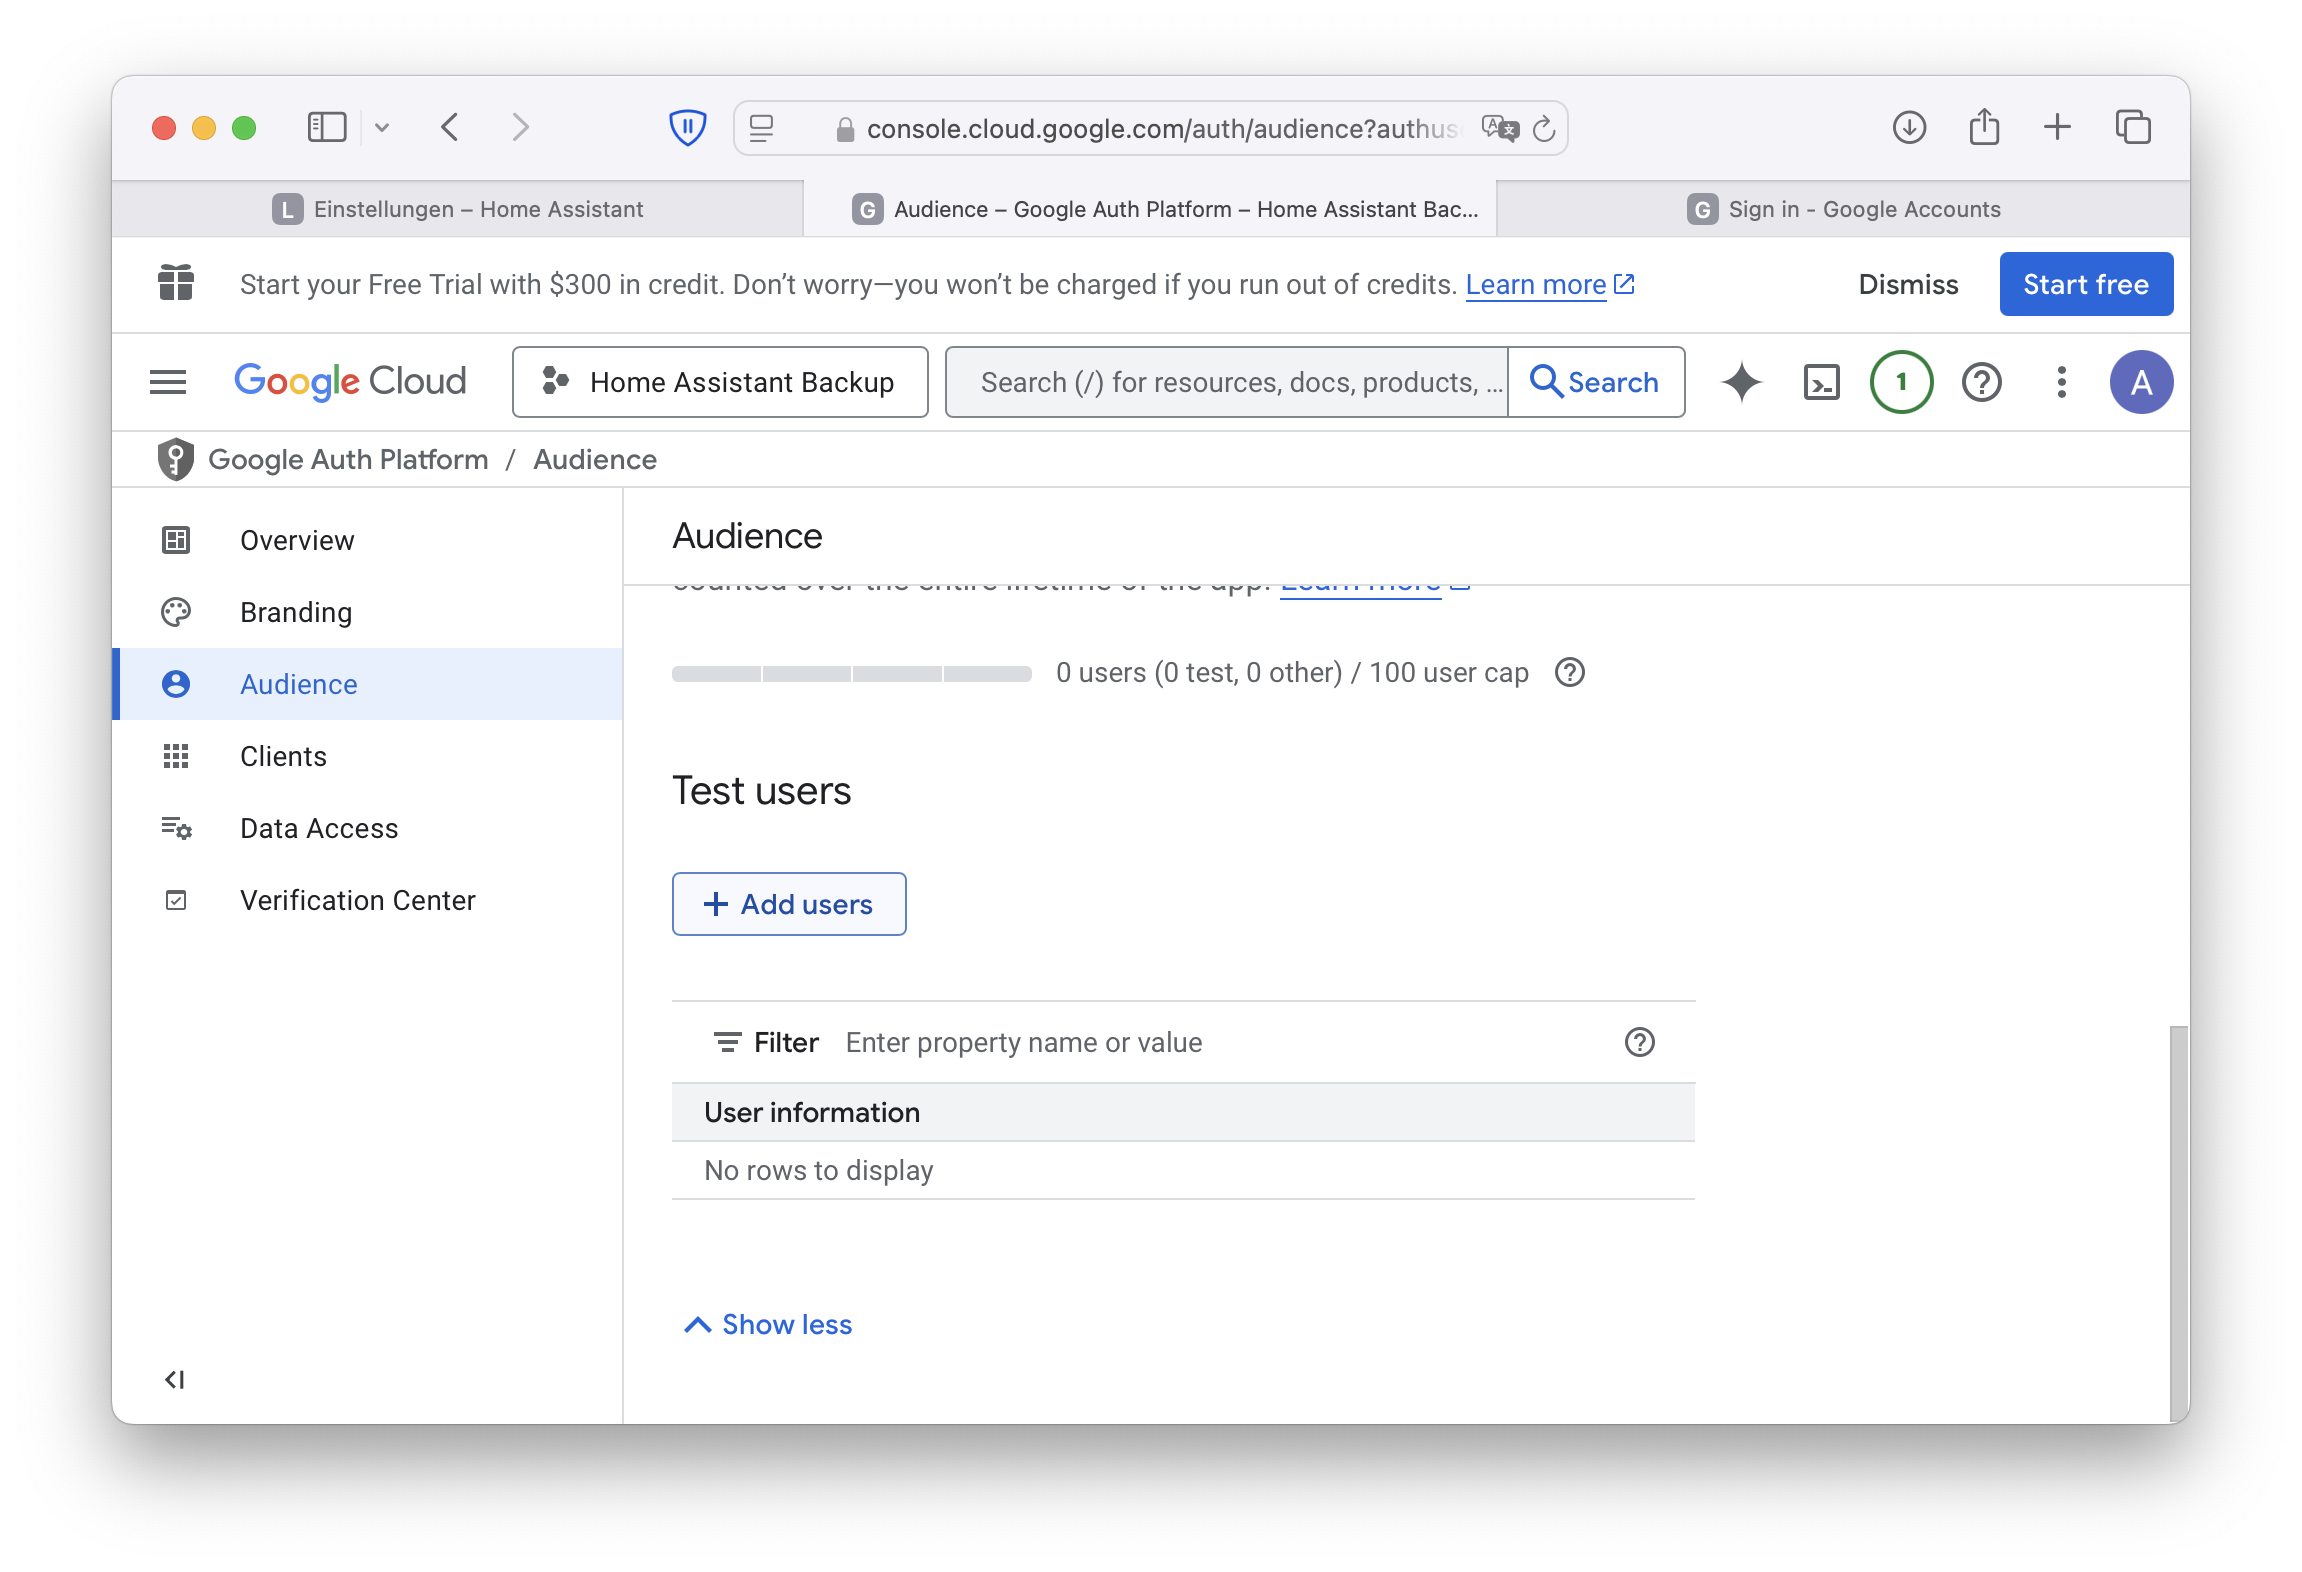
Configuring Audience and Test Users
To actively use the authentication, you still need to add your email address as a test user on the Google side.
- In the Google Cloud Console, navigate from Clients to Audience in the left sidebar.
- Scroll down to Test Users.
- Click Add Users and enter your Google email address.
- Confirm your entry.
Enabling the Google Drive API
Before everything works, you need to enable the Google Drive API in the Google Cloud Console so that Home Assistant can use it after authentication.
- In the Google Cloud Console, switch from Google Authentication Platform to APIs & Services in the left navigation bar.
- Click Enable APIs and Services.
- Type Drive into the search field.
- Select Google Drive API from the search results.
- Click Enable.
This may take a few seconds. Afterwards, you’ll be redirected to a screen showing details about the Google Drive API usage.
Completing the Connection with Home Assistant
- Return to Home Assistant and click Open Website.
- Select your Google account again if prompted.
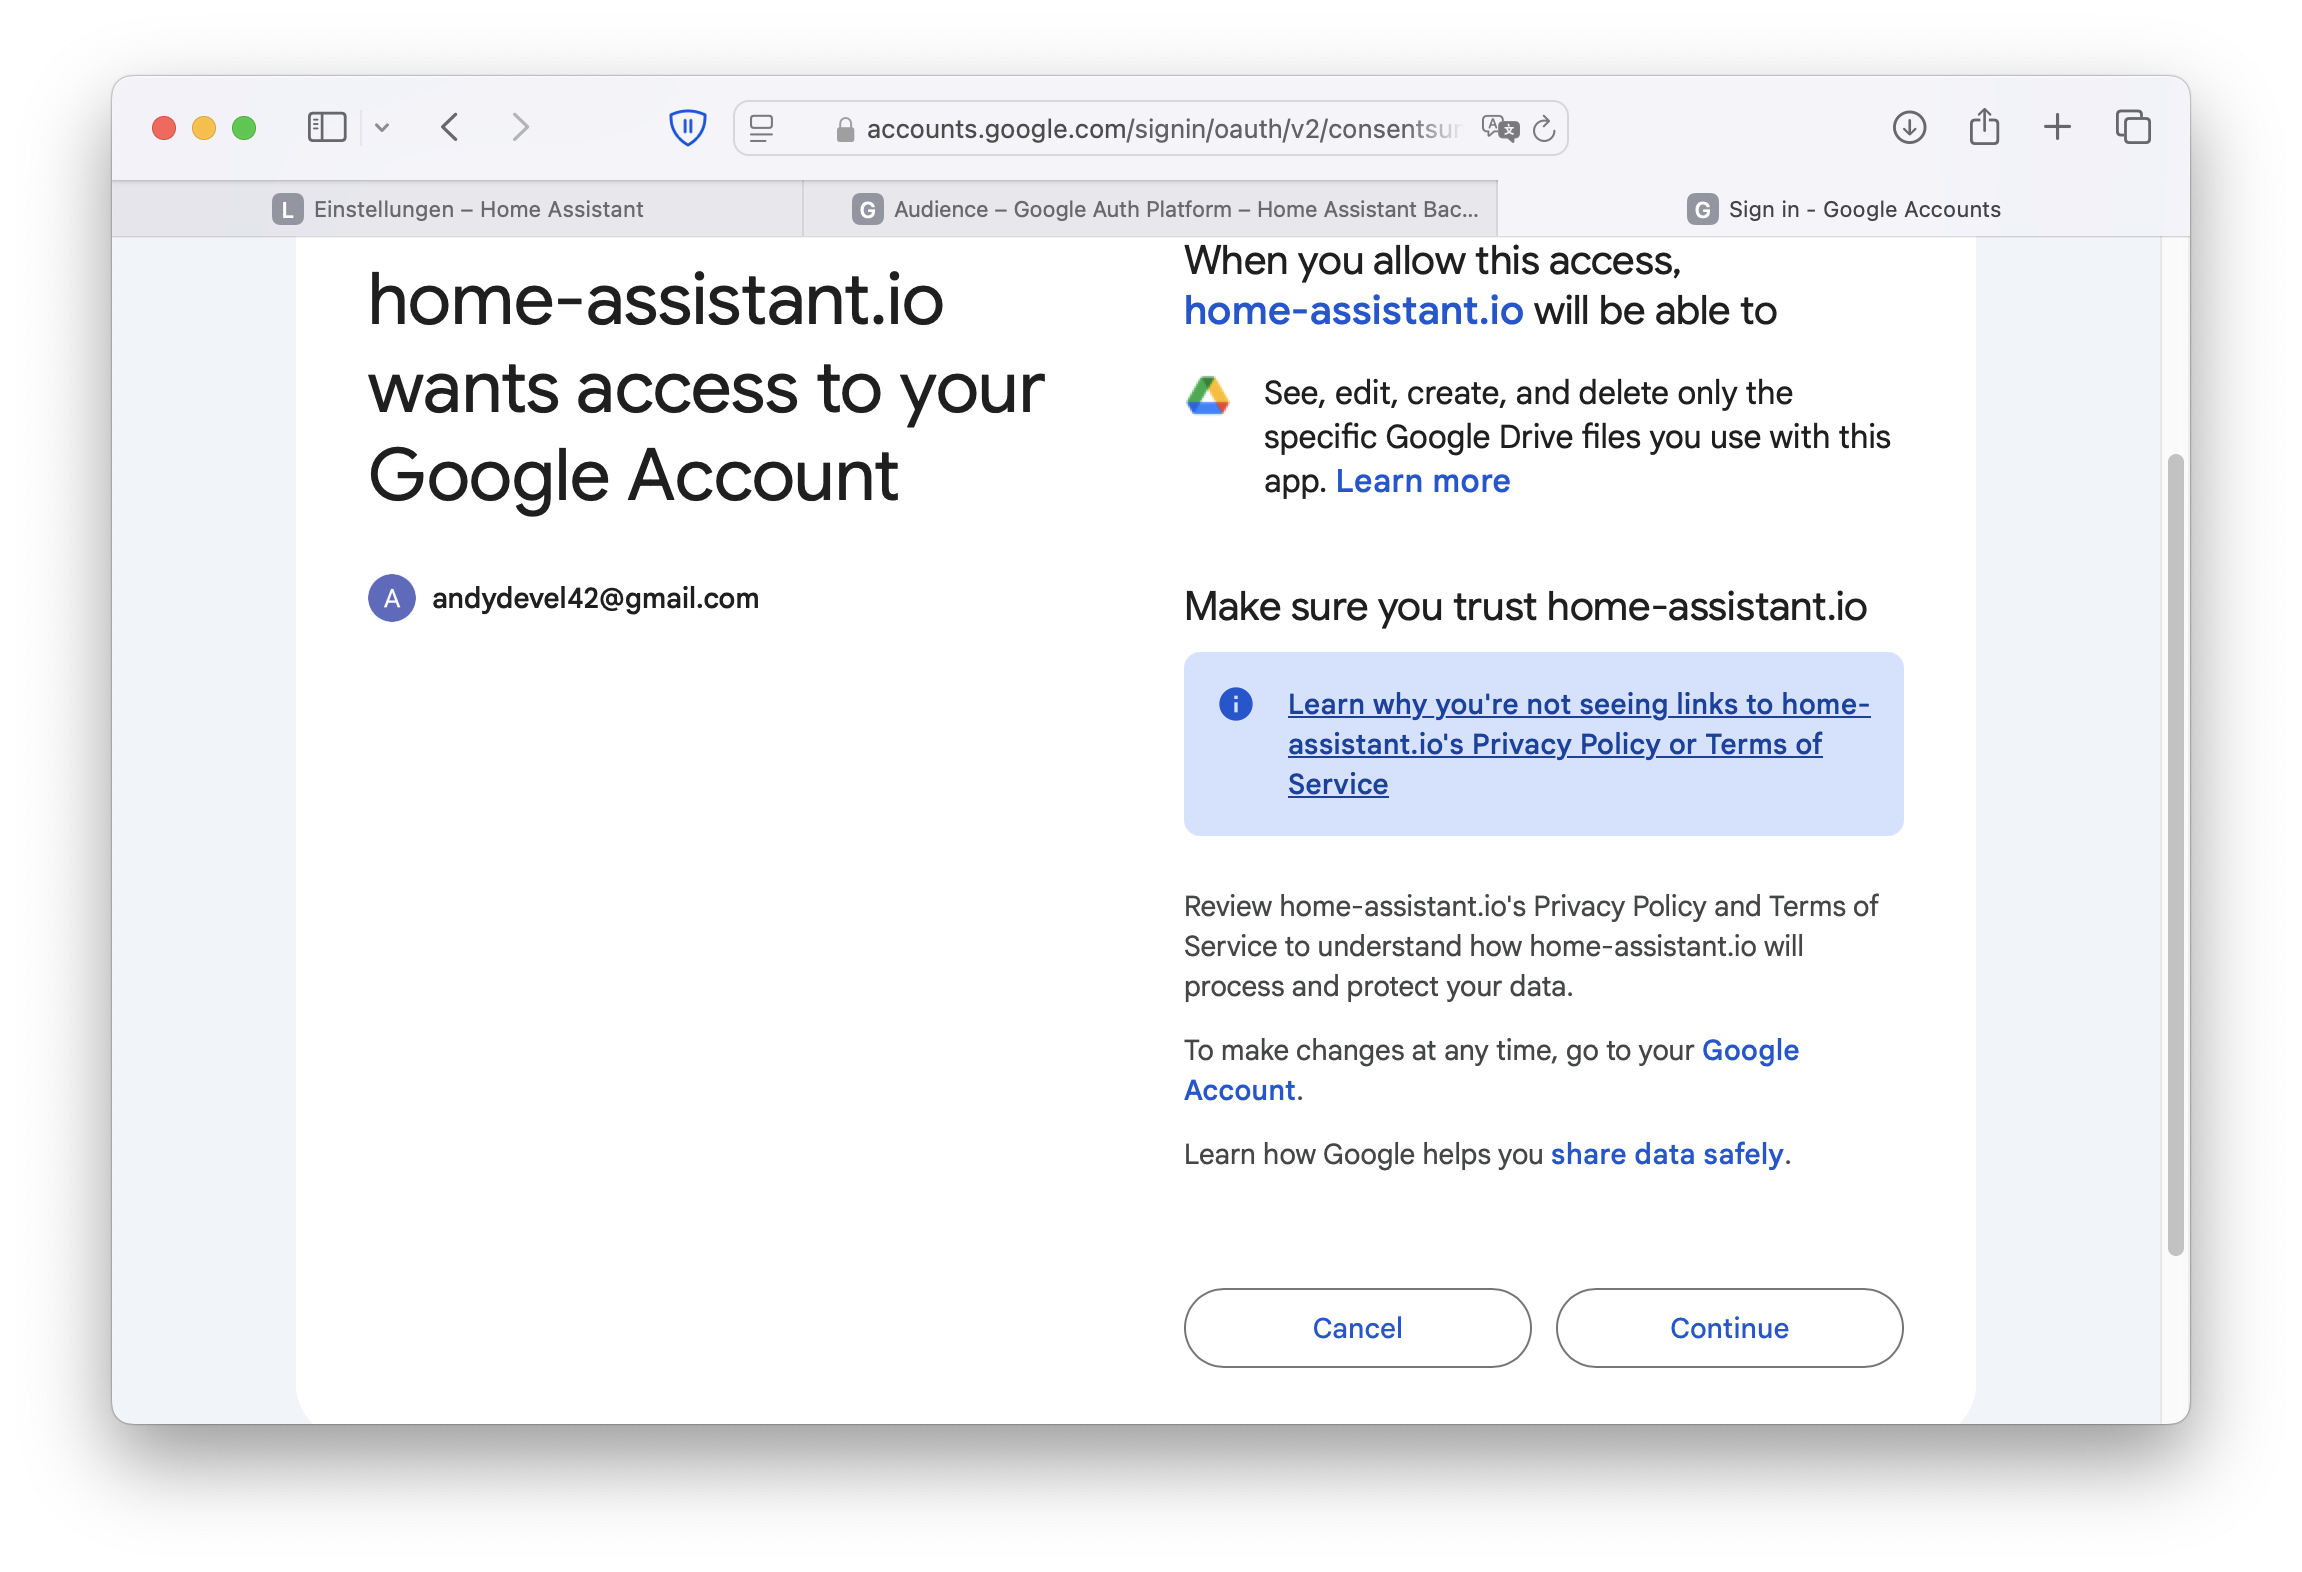
- Confirm Google’s warning that this application has not been verified by clicking Continue.
- On the next screen, confirm that you want to link your Google account with Home Assistant and click Continue.
At this point, a wizard to open My Home Assistant Links may appear.
- Enter your Home Assistant URL once and confirm with Save.
- Finally, the prompt Link Account Home Assistant will appear, which you can confirm by clicking Link Account.
Completing the Setup in Home Assistant
- Return to Home Assistant, where you’ve already entered the API Key, OAuth Key, and Client Secret.
- Click Open Website.
- Select your Google account and confirm that the app has not been verified by clicking Continue.
- Confirm once more that you want to proceed with the configuration.
- Finally, click Link Account.
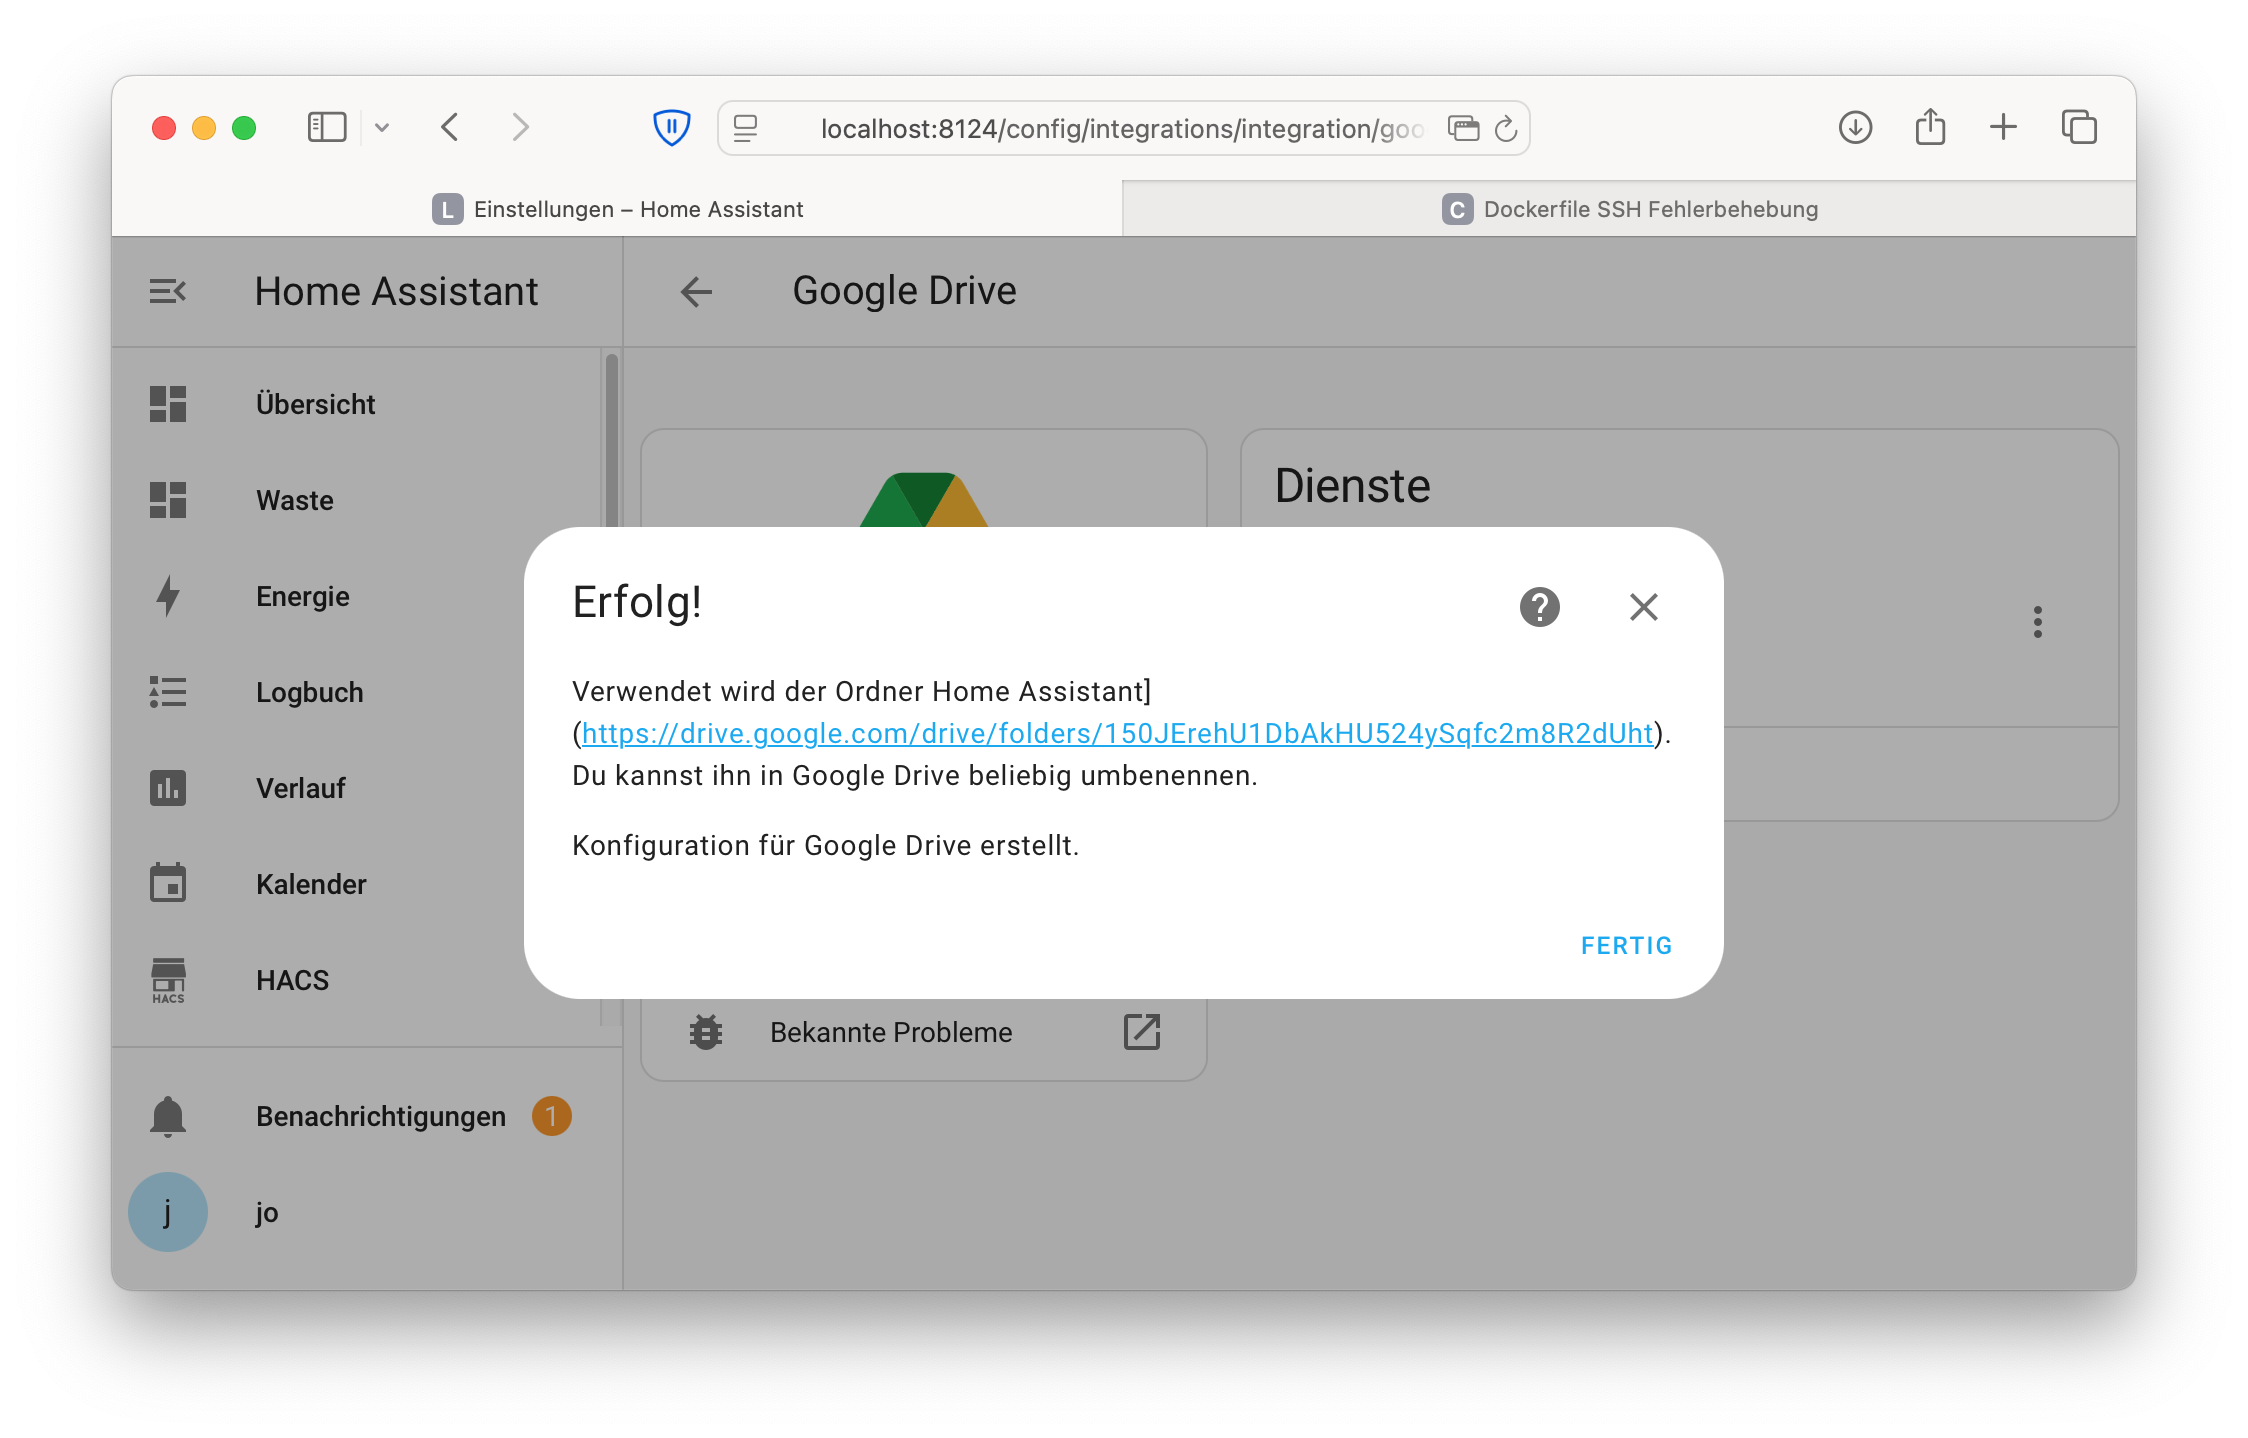
If everything has been set up correctly, you’ll receive a Success message in Home Assistant confirming that the Google Drive configuration has been created.
Configuring Backup Settings in Home Assistant
You can now – as you may already know from the previous video – go to Settings > System > Backups, then Backup Settings > Backup Locations and enable Google Drive there.
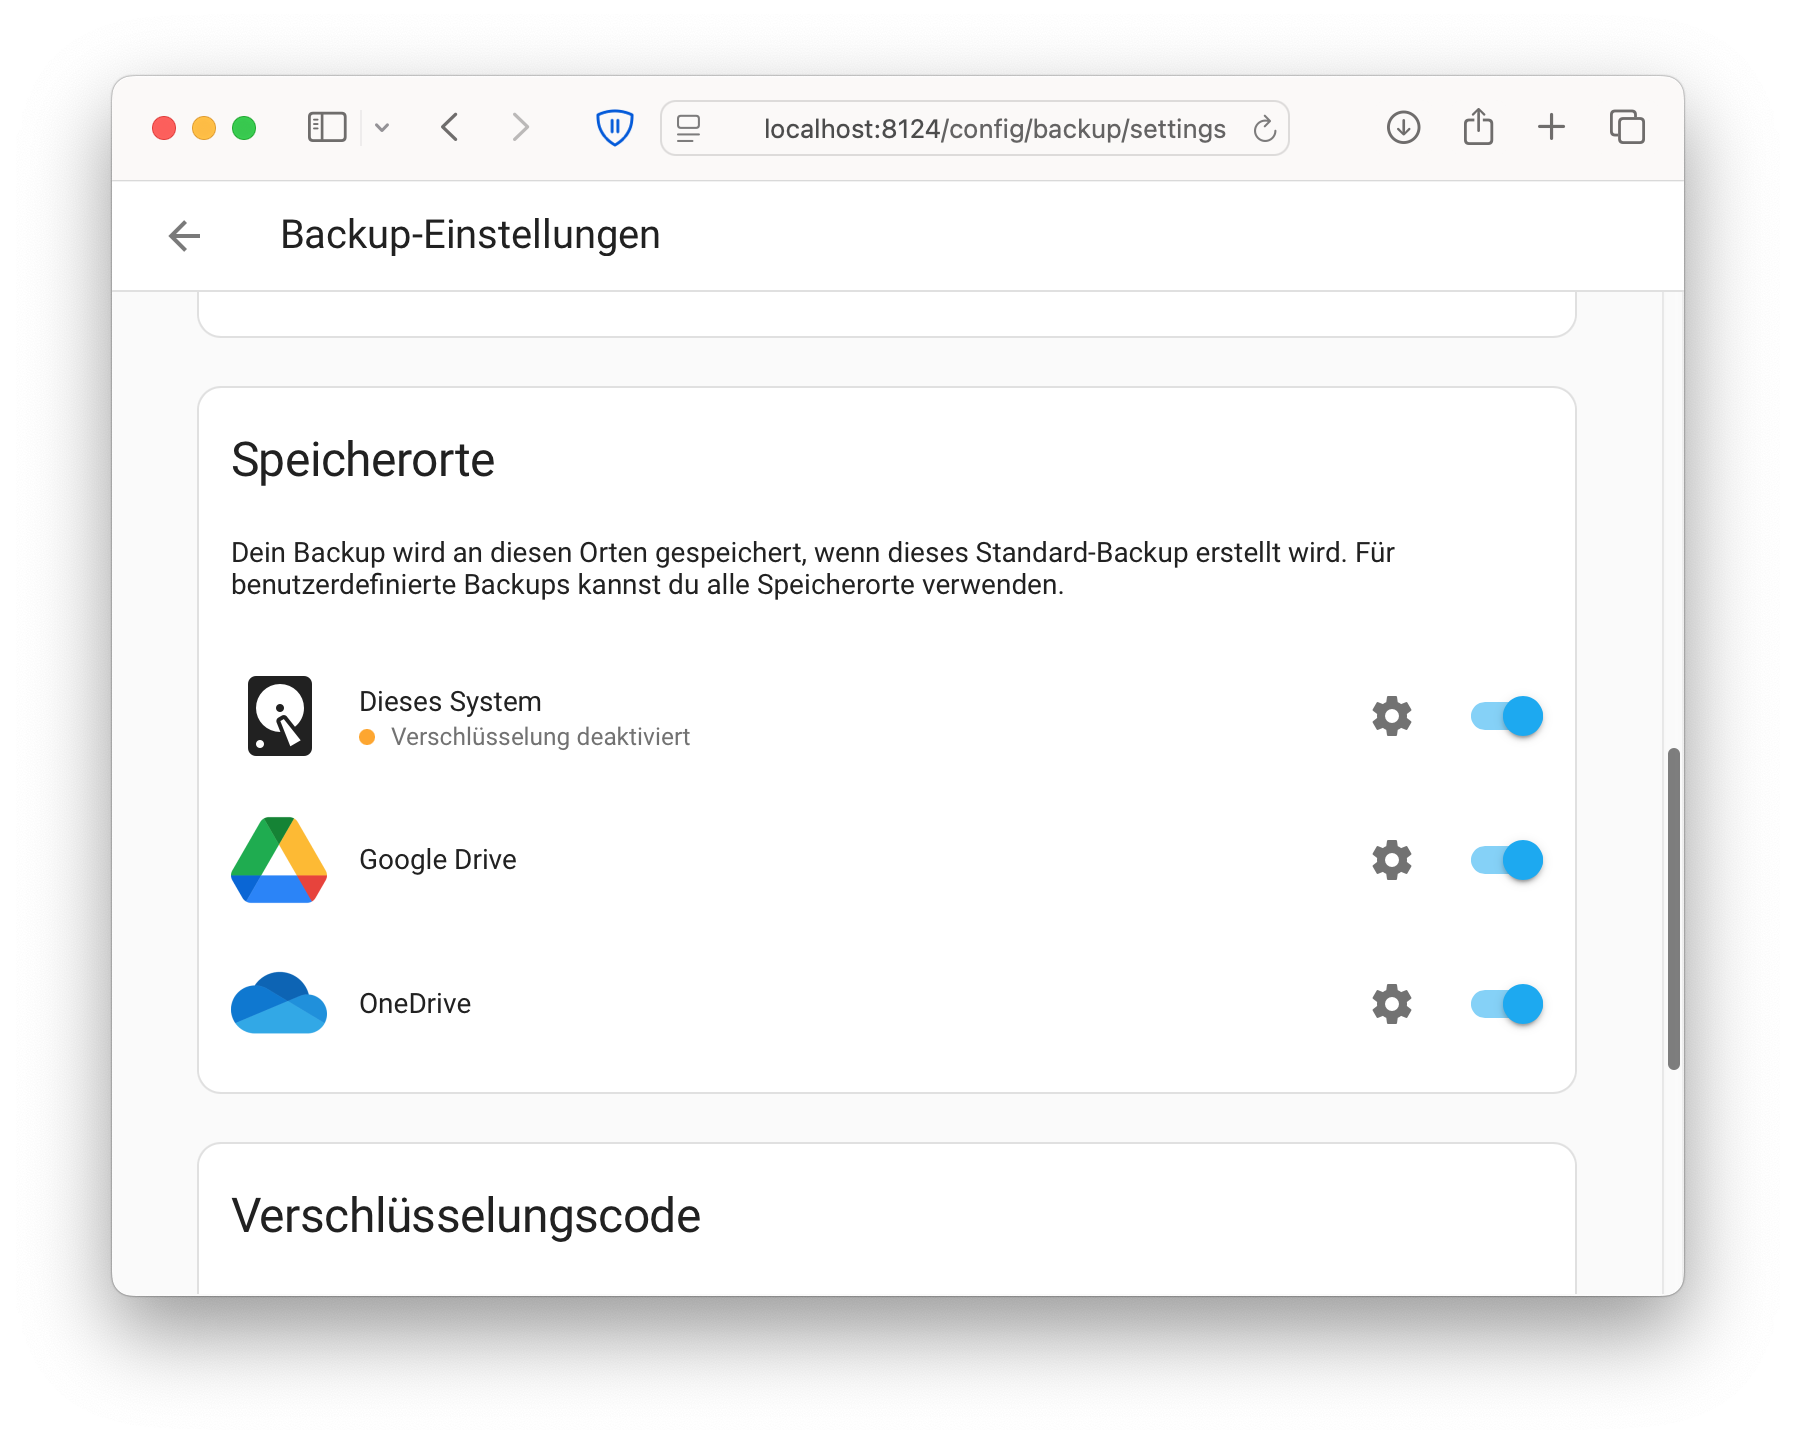
From now on, your backups will be saved not only locally, but also to Google Drive.
→ If you want to understand why it’s important not to rely solely on manufacturer clouds, this article is worth a read: Wenn dein Smart Home plötzlich dumm wird – und was du dagegen tun kannst